Have a Question?
Setup Expense Reporting Approval Process
Approval Process Setup for Expense Report Notifications & Status Update:
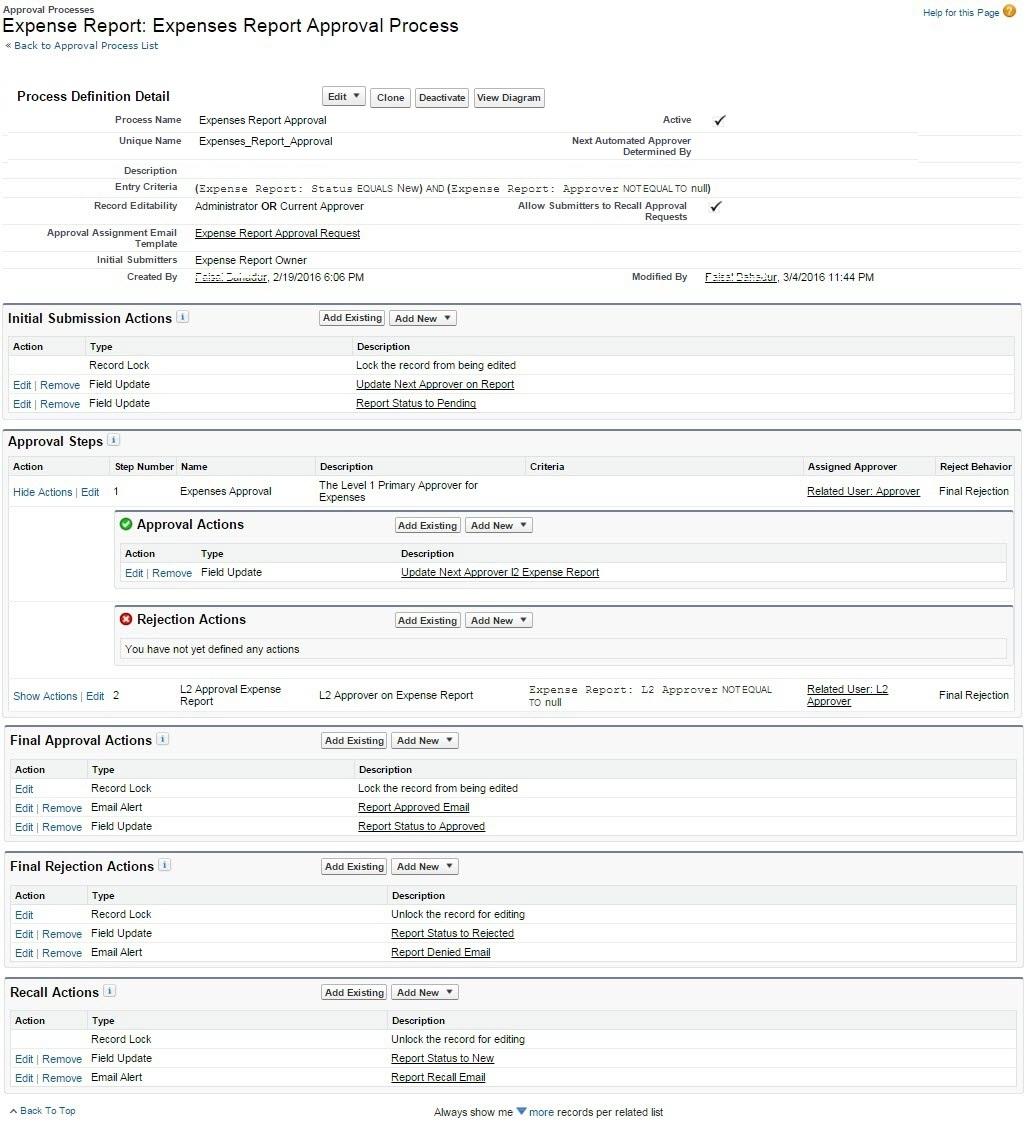
You need to create an Approval Process for Expense Report object. The approval process definition should look like the following:

Approval Process Steps
You will need to perform the following steps in your approval process to lock the record after initial submission, update status field, and send email notification to the approver.
- Create Approval Process on Expense Report Object
- App Setup > Create > Work Flow Approval Process > Approval Process
- Select Use Standard Setup Wizard from the picklist of Create New Approval Process and follow wizards Steps and enter following values
- Process Name: Expense Report Approval Process
- Define criteria for Status == New And Approver != null
- Automated Approver to determine = None, Set Record Editability Properties to 2nd Radio button for Administrator OR the currently approver…
- Select Approval Assignment Template = Expense Report Approval Request
- Select the Fields those will be displayed for approval record; select the check box for Approval Page Fields
- Specify initial submitted i.e. Expense Report Owner; Select the checkbox for Allow submitters to recall approval requests > Save
- Select No, I’ll do this later. Take me to the approval process detail page to review what I’ve just created. Option in the wizard and go to Approval Process Definition
- Add Existing Field Update action to Initial Submission Action section via wizard
- Select Field update from search
- Select Report Status to Pending and Update Next Approver on Report from Available actions.
- Save
- Create New Approval Step1 name it Primary L1 Approval & follow the wizard
- Set criteria to All Records…
- Select Approver field from the related user to Automatically assign to approvers
- Add Existing Action in Approval Action and select field update from search and select Update Next Approver L2 Expense Report from Available actions.
- save
- Create New Approval Step2 name it L2 Approval & follow the wizard
- Set criteria to L2 Approver != null
- Select Approver field from the related user to Automatically assign to approvers
- save
- Add the following Existing action to Final Approved Action section
- Field Update > select Report Status to Approved from available actions
- Email Alert > select Report Approved Email from available actions.
- Add the following Existing action to Final Rejection Action section
- Field Update > select Report Status to Rejected from available actions
- Email Alert > select Report Denied Email from available actions.
- Add the following Existing action to Final Recall Action section
- Field Update > select Report Status to New from available actions
- Email Alert > select Report Recall Email from available actions.
- Activate the Approval Process
